How to Fix Irritating Wi-Fi Network Connect Sound

You may hear an annoying clicking sound when your Wi-Fi network reconnects or disconnects occasionally or frequently on your PC. Least to say that the alert sound can irritate you very much and drive you up the wall and thence you may want to fix it as soon as possible and if you can. Well, you surely can mute this irritating sound with these little workarounds.

wifi-connect-sound

Step 1: Mute Sound in Router Folder

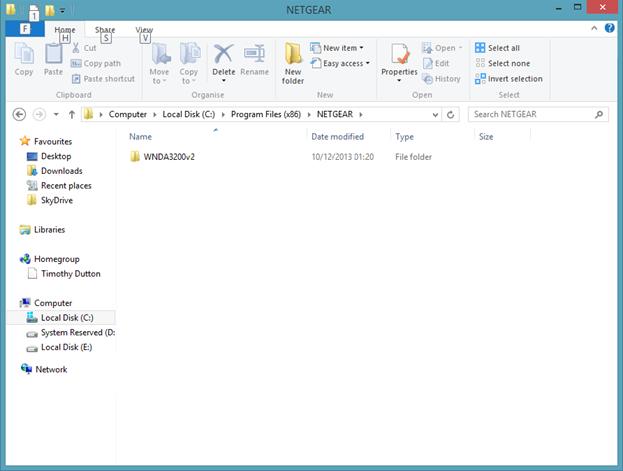
Since you have a Wi-Fi network, you inevitably have a Wi-Fi router whose settings you need to tweak to mute this irritating sound. The sound for your Wi-Fi router’s connection lies with a file in its folder in your computer. Let’s take example for a Netgear router whose sound file you must find in the “Computer> C:\> Program Files> Netgear> WNDA3200v2> Driver> ConnectToInternet.WAV”. Delete the “ConnectToInternet.WAV” file by right clicking it and selecting “Delete”. If prompted, confirm the delete action. If you see many .WAV files in the “Driver” folder, then delete each file one by one, check whose deletion stops the sound and you are done.

netgear-program-files

P.S. Similarly find files in the folder of your respective router viz. Asus, Belkin, Buffalo, Linksys etc. and get rid of them to get rid of the pesky sound every time you connect to your Wi-Fi network or the Internet.

Step 2: Disable Default Windows Sound

If any other sound comes up after disabling the sound on your router, then check, it must be the default Windows sound (if you have a Mac, then mute its default sound), which is chiming during the connection. If it is intolerable to you, then mute it and unmute it only if you really need it. To do so, browse to “Control Panel” and find the “Sounds and Audio Devices” item. Double click it and in the “Properties” window, highlight the “Sounds” tab and then select “No Sound” from under the “Sound Scheme” drop down menu.

Step 3: Use a Tool to Mute Sound

If your problem is not fixed, then use a tool like Nero Wave Editor to edit the default sound file(s) and record a blank one to do the needful. You can use any tool you want but use it on your own risk as we do not endorse the use of any third-party tool.

online_technical_support

If the clicking sound constantly chimes and irritates you when the Wi-Fi network is connected or reconnected to or during other processes, give us a call at our toll-free number +1-877-907-4935 and get an expert to help you mute it or fix any other problems which you may face.

How to Fix Windows 7 Error Code 7


The error code 7 “ERROR_ARENA_TRASHED The storage control blocks were destroyed” is a common error in Windows 7 machines, primarily occurring because of virus/malware infections, missing/damaged configuration settings, corrupt host file, invalid/corrupt registry entries and sub-keys, outdated driver software and more. Leading system freeze up, slowdown, crash, and errors among other severe problems, the error is quite smart and make you throw in the towel. Fix the error and boost Windows 7’s performance and life for use years after years.

error-message-0x000007

Step 1

Update Windows 7 with the latest available updates to install fixes, patches, performance enhancements, new installs and more. Launch Windows Update from the “Start” button, All Programs, Windows Update. You must be an admin on your Windows 7 machine to access Windows updates and install them. The installation and configuration of updates and enhancements may take a great deal of time, so be patient and do not shut down the machine during this procedure. When finished and prompted, restart Windows 7. When it has rebooted fully, check if the error has been fixed or not. If not, proceed to the next step.

windows-update

Step 2

Download PC Cleaner Pro from Microsoft’s official website or a random but safe one. Click the Save File button to save the file. Choose a location or otherwise it will be automatically downloaded to the Downloads folder. When done, browse to the location and double click on the PC_Cleaner_Pro.exe file. Hit the Run button to initiate the install procedure. Follow the on screen instructions and complete installation.

pc-cleaner-pro

When finished. Double click on the PC Cleaner Pro icon to open and start the repair procedure. It will automatically scan for all the errors. Click on the Fix All button to fix all the errors. Wait until the error is being repaired. You will see a message similar to successfully repaired etc.

P.S. We do not endorse any third-part software or product. Citing of a program only satisfies the reason that it may used as a suggested cure for the problem you are facing. For any consequential damage or corruption to your machine, you are solely responsible for your actions. We don’t bear none responsibility for third-party software.

Step 3

If the issue still persists, launch Command Prompt as an administrator from the “Start” button, typing “cmd” in the Start Search bar, right clicking and selecting “Run as an administrator”.  In the window, type ‘bcdedit /set {bootmgr} displaybootmenu no’ and “Enter”. This command works only when you have a single operating system installed on your machine. If there are dual or multiple operating systems installed on your machine, it will not work. Exit the Command Prompt window and restart your Windows 7 machine.

bootmanager

Step 4

A virus or spyware among other malicious infections can expose your machine to dangerous problems including data loss, system freeze, lockups, slowdown, and performance lags, and errors among others. This error is one of the problems caused by an infection. Thus, update your security software (antivirus) and run a complete scan. Since the full scan will take an hour or more time, you will need to bear with it until finished. Prompt your antivirus to delete or quarantine the infections as desired.

Step 5

If the issue persists, download and run a registry cleaner tool. You can choose a free or paid tool depending on your requirements. You should always back up your Windows Registry before running this type of tool. A registry cleaner/repair software is not highly recommended as it is not always successful in clearing up or repairing registry and thus is not a problem fixer. Despite that it can be run to fix up some of the issues which you cannot manually handle due to lacking the expertise in handling Windows Registry.


online_technical_support

Though these are tested and proven workarounds, however depending on the nature of problem and any internal issue, you may not be able to solve the problem. In such a scenario call us at +1-877-907-4935 and get an expert to help you.