When you think of updating your Netgear router’s firmware, you tend to care for this small piece of hardware you are using for the purpose of wireless, networking, and Internet etcetera. A firmware update is the software update for your Netgear router hardware. The update is designed to fix hardware-related issues, bugs, boost wireless signal strength, and enhance its reliability, performance, lifecycle etcetera. Netgear releases firmware updates for its products from time to time for their enhanced functionality and durability.
Going forward, if you want to update your Netgear router firmware, check the steps given below and do so:
Things you will need:-
- Netgear router
- Router username and password
- Internet connection
*Remember that during firmware update, the Internet connectivity will temporarily not work. It will be automatically restored once the updated is done! There is nothing to worry about because it is an automated procedure.
Step 1: Back up existing settings
Do not forget to back up your existing router configurations before beginning with the firmware upgrade. Or else, you will lose them all post-update, feeling the need for setting up your router for wired/wireless connection or access point from the beginning.
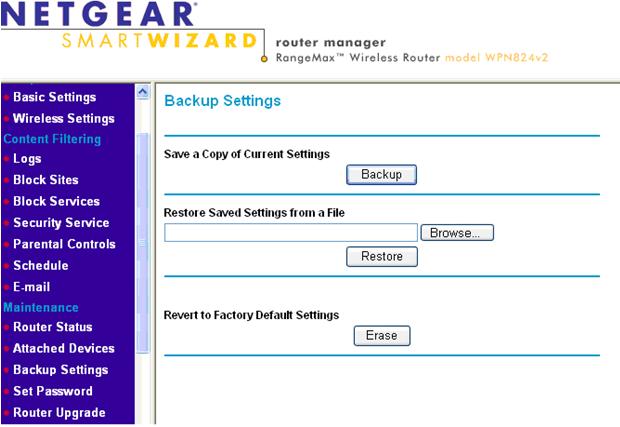
To back up your settings, pull up the Netgear router’s web interface in your web browser through the default IP address “192.168.1.1”. When prompted for a login, enter the router’s username and password and click “OK”. Now that you are logged on to “Netgear router setup” utility, click “Backup Settings” under “Maintenance” in the left hand pane. Click the “Backup” button under “Save a Copy of Current Settings” and choose the destination folder to put the backup copy of your existing settings. This will help you restore them post-firmware-update, saving you great deal of time which will otherwise be lost while setting up the router from the beginning. Close all the windows except the web browser one.
Step 2: Do the needful
Visit the official Netgear website and select the “For Home” section if it is not already on it. Click the “SUPPORT” section on the top right hand corner of the screen and click “Download Center”.

If you know your Netgear router’s model number like WPN824v2 etc., type it in the ”Enter a Product Name/Model Number” box and select the “Firmware/Software” checkbox also to right away get access to the latest available firmware version for it.

If you do not remember your Netgear router’s model number, then simply click the “PRODUCT DRILLDOWN” button and select one from the next tally of options. You can also look at the bottom side of the device for model number and other details, which also come printed on the documentation originally shipped with it. Once you have found the model number, simply look for the available firmware version for it.

Once you see the available firmware versions, click the latest one from them and then you will directed to the download page. Click the “Download Now” button to start downloading the firmware version.

You may also region-specific firmware version downloads. If you do see such options, then select the one which applies to your region and then proceed. Save the file to your computer when prompted and then close down the browser window.
Step 3: Access Router’s Web Interface
Now directly connect your Netgear router to your computer using the Ethernet cable. Open your browser and pull up the default IP address “192.168.1.1” or “http://www.routerlogin.net” in its address bar.
When prompted for login, enter login details and continue. On the next screen, click “Router Upgrade” under the “Maintenance” section in the left hand side. Click the “Browse” button under “Locate and Select the Upgrade File from your Hard Disk:” and look for the downloaded firmware file from the Netgear website. Select the file and then click the “Upload” button. If you see any warning, click “OK” or “Yes” to let the procedure continue. Wait while the firmware version is being upgraded.

Step 4: Complete the procedure
When done, click “OK” to proceed. Your Netgear device will restart during the upgrade procedure. When done, skip to the next step.
Step 5: Restore backed up settings
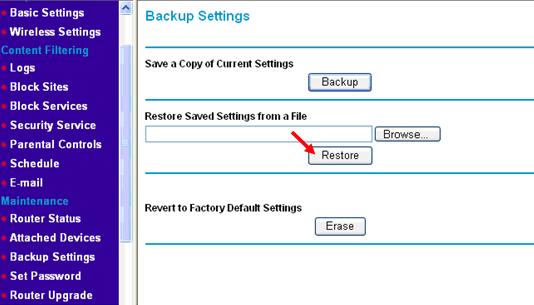
Now that the upgrade procedure is completed, login back to the router’s web interface and click “Backup Settings” under “Maintenance”. Click the “Browse” button under “Restore Save Settings from a File”, select the backup file and then click the “Restore” button. Wait for the settings to be restored so that you can right away start using your Wi-Fi, access point and other customized ones.

If you experience problems while upgrading Netgear router firmware as it may fail or result in trouble or post-firmware-update you find that you cannot connect to Wi-Fi or Internet, call us @ +1-877-907-4935, toll free, and talk to a Netgear router expert to fix them.
